

“Breast size doesn't matter” is meant to reassure, but it can leave out the part that matters when you're trying to feed a baby: larger breasts can make it harder to see the latch, support the breast's weight, and sit comfortably. That doesn't mean your breasts can't make enough milk, or that difficulty is your fault. It means it helps to separate three questions that are often bundled together: supply, latch, and physical comfort.
For large breasts breastfeeding, the useful starting point isn't a promise that size is irrelevant. It's figuring out which of those three concerns applies to you, then choosing a practical adjustment for that problem.
Why Large Breasts Rarely Limit Milk Supply
Breast size itself doesn't determine how much milk you make. Milk removal depends primarily on how effectively and frequently your baby feeds, including how well your baby attaches and how they're positioned. Think of a garden hose: a wider tank doesn't make water flow through a kinked pipe. In breastfeeding, effective attachment and regular feeding help keep milk moving. Clinical guidance on breastfeeding challenges emphasizes comfortable alignment and effective milk removal.
The trouble is that supply, latch, and strain can feel like one big problem. They're better treated as separate questions, because each has a different answer and a different first step.
| Three Questions Large Breasts Raise | What Actually Decides It | What Helps Most |
|---|---|---|
| Can I make enough milk? | Frequency and effectiveness of milk removal | Feed on demand and watch for swallowing and wet diapers |
| Can my baby get and keep a deep latch? | Visibility, breast support, and the baby's position | Try a football or side-lying hold, supporting the breast from below |
| Can I feed without neck, back, or breast strain? | Breast weight, bra fit, and posture | Use structured support and pillows to bring the baby to the breast |
Sort supply worries from latch mechanics
A larger or more pendulous breast can hide the nipple and your baby's mouth. That can make it hard to see whether the mouth is open wide or whether your baby is staying firmly attached, even when milk production is not the issue. Breast weight, nipple shape, and how easily you can move or support the breast can all affect the mechanics of a feed.
Body weight is a separate consideration. The research discussed in a study of breastfeeding challenges for women with large breasts distinguishes the practical difficulties of positioning and visibility from concerns that may accompany obesity, including delayed milk production. That means it's worth getting individualized help if milk production seems slow. If you're worried about your baby's weight gain, don't assume the cause is your bust size. Ask a lactation professional to observe a feed and assess milk transfer.
Treat difficulty as a puzzle, not a verdict
A latch that's hard to see calls for a positioning and visibility change. Body strain calls for support and posture adjustments. A supply concern deserves a feeding assessment, not a judgment about your body.
Choose the row that best matches your concern as you read on. The goal isn't to prove that feeding should be easy. It's to identify what's getting in the way and find support that fits.
Four Positions That Keep the Nipple in View
The best hold lets you see the nipple and support the breast's weight at the same time. The comparison below can help you choose a starting point. A position that works at one feed may not be the most comfortable at another, so let the specific situation guide you.
| Position | Best When | How It Handles Heavy Breasts | Watch For |
|---|---|---|---|
| Football (clutch) hold | Cesarean recovery, large or pendulous breasts, or a baby who slides off | Baby rests under your arm; you can support the breast from below and see the mouth | Pushing the baby's head forward or pinning the breast flat |
| Side-lying | Night feeds, a tired parent, or a heavy lower breast | Gravity lets the breast fall away from the baby's face while you support it from above | The top breast can block your view; check the latch with a mirror |
| Cradle hold | Early feeds when you're lifting a smaller baby to breast level | Baby is raised to the breast, so you don't have to pull the breast down | Leaning forward instead of raising the baby with pillows |
| Cross-cradle hold | Learning the latch or guiding the baby's head | One hand guides the baby while the other supports the breast | Pulling the breast down toward the baby's chin as the mouth opens |

Choose a hold for the problem in front of you
In the football hold, the baby rests beside your body under your arm. This can make it easier to support the breast from below and keep the baby's mouth in view. A pillow can help bring the baby to breast height, especially if you're recovering from a cesarean birth or your baby tends to slide away from the breast.
Side-lying takes some of the baby's weight off your arms and may make a tired feed feel less strenuous. The lower breast can fall away from the baby's face, but the top breast may get between your eyes and the latch. Use a mirror or ask someone you trust to check that your baby is attached comfortably.
For the cradle hold, raise the baby with pillows rather than leaning your own body forward. In the cross-cradle hold, your hand behind the baby's shoulders and head can give you more control as you guide them onto the breast. In either hold, use your free hand to support the breast from underneath, with your fingers behind the areola rather than pressing on it.
A useful rule: Choose the hold that lets you see the latch and stay relaxed during this feed. You can change positions as the day, your baby, or your comfort changes.
How to Check a Deep Latch Step by Step
A deep latch can be confirmed even when your breast partly blocks your view. Look for how the baby is positioned, how the mouth meets the breast, and whether you can hear steady sucking and swallowing. Breastfeeding guidance from ACOG also highlights the value of comfortable alignment and audible swallowing when assessing feeding.
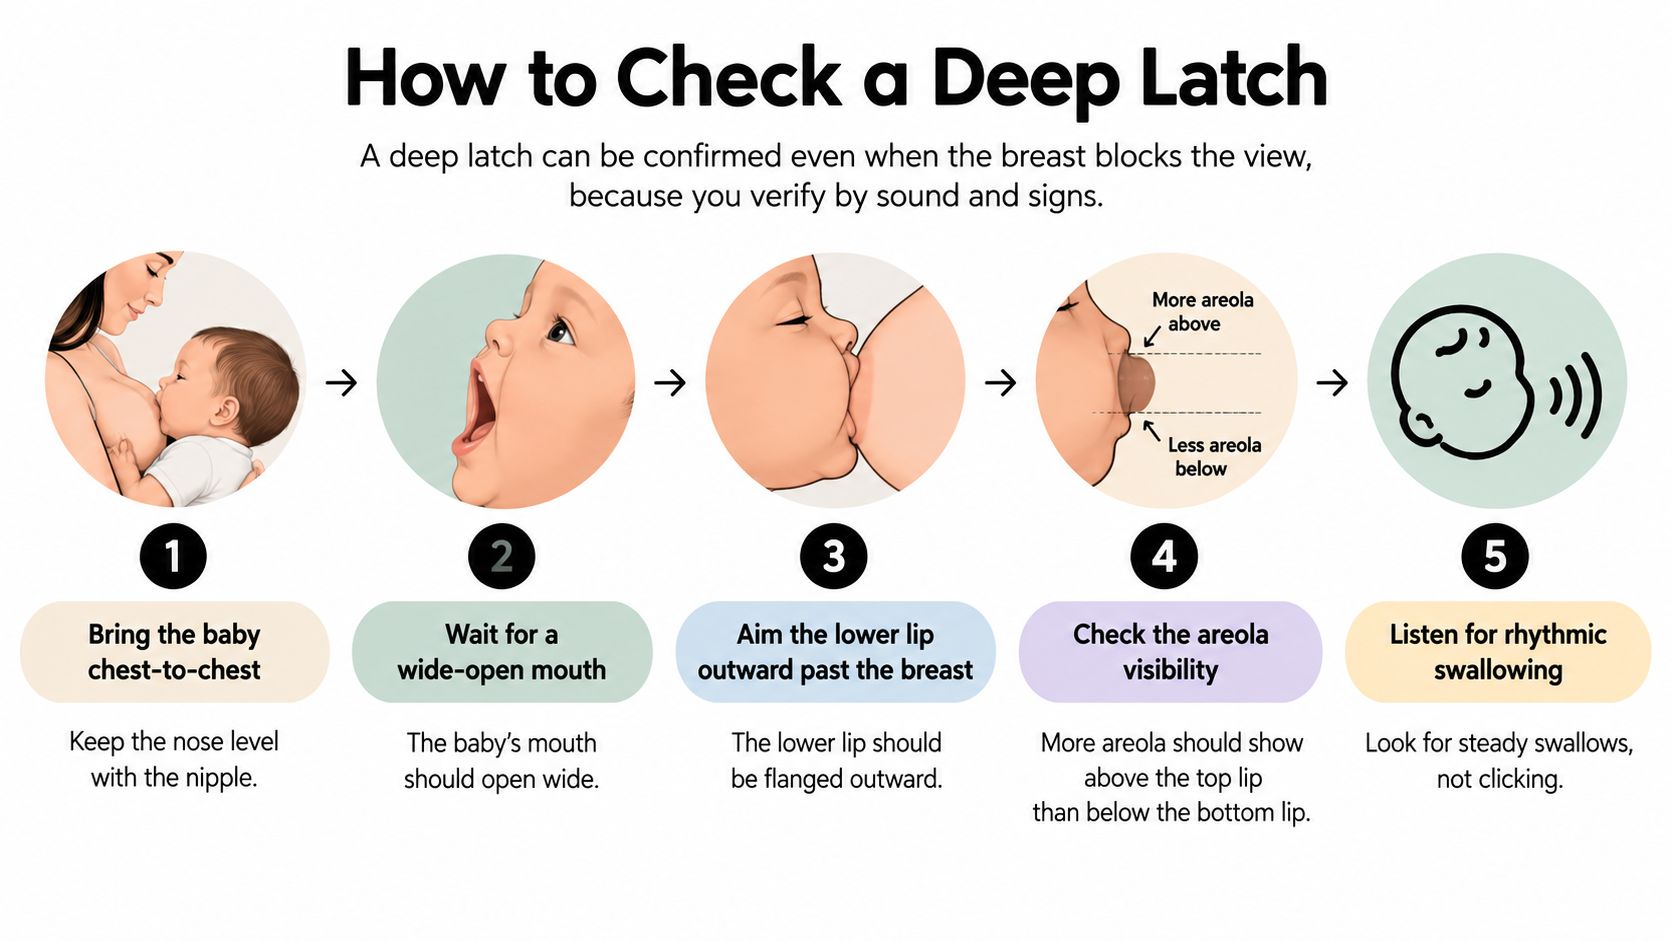
- Bring your baby chest-to-chest. Line their nose up with your nipple and let the head and neck tip back slightly. This helps your baby open the mouth toward the breast; a common slip is turning the head forward or holding the baby too far away.
- Support the breast in a C-hold. Place your fingers behind the areola and press gently back toward your chest, not down toward the baby's chin. This keeps the breast supported without flattening the area the baby needs to take in; avoid shifting your fingers onto the areola.
- Brush the lower lip and wait. Let the nipple touch the baby's lower lip, then pause until the mouth opens wide. A wide gape gives the baby a better chance of taking in a deep mouthful; don't hurry the nipple into a partly open mouth.
- Bring the baby to the breast. When the mouth opens, move your baby in so the chin touches the breast first. Keeping your baby close helps maintain the angle for attachment; the common mistake is leaning forward or pulling the breast down to meet the baby.
- Check the shape of the latch. Look for the chin against the breast, the lower lip turned outward, and more areola visible above the top lip than below. If you can't see clearly, adjust your angle or ask someone to observe rather than pressing the breast flat.
- Listen as your baby feeds. Rhythmic sucking and audible swallowing are useful signs that your baby is transferring milk. A steady pattern matters more than watching for every movement, so pause if you hear clicking or don't hear swallowing.
- Break the seal before you lift your baby away. Slide a clean finger into the corner of your baby's mouth to release suction gently. Pulling your baby away without breaking the seal can put pressure on the nipple.
You don't need to keep troubleshooting alone if the feed stays painful, you don't hear swallowing, or your nipple becomes injured. Those signs call for direct observation by a lactation professional. If you're also looking for foundational feeding guidance, see these breastfeeding tips for first-time mothers.
Support Features That Hold Without Squeezing
A supportive nursing bra should carry breast weight without compressing the areola, obstructing milk-bearing tissue, or forcing the nipple downward. A brand name or a polished product description can't tell you whether a bra works for your body. Check the fit while you move and, if possible, during a feed.
| Feature | What to Look For | Why It Matters |
|---|---|---|
| Band | Firm, non-stretch, and level under the bust | Carries much of the weight so the straps don't have to |
| Cups and side panels | Broad, supportive panels with full coverage | Spreads the load without pressing the areola |
| Underwire | If present, sits on the fold away from the breast root | Supports without pressing milk-bearing tissue |
| Straps | Wide, adjustable, and softly padded | Helps reduce shoulder grooves and neck strain |
| Fabric | Breathable, smooth, soft stretch material | Limits heat, moisture, and friction beneath the breast |
| Access | One-hand or drop-down cups that open fully | Makes feeding access easier and keeps the latch visible |
Fit matters more than the label
A band that rides up, red marks that linger, or a wire digging into breast tissue are signs the fit isn't working, whatever the price or brand. Look for seams and underwire that stay away from the breast root and don't press into the tissue. Adjust the straps so they support without cutting into your shoulders, and check that the cups allow normal movement rather than squeezing the breast.
With a larger bust, dependent breast tissue and the fold beneath the breast can be more exposed to heat, moisture, and friction from a poorly fitted garment. The Academy of Breastfeeding Medicine's mastitis protocol describes mastitis as inflammation involving breast ducts, alveoli, and surrounding tissue. Compression or incomplete drainage can contribute to inflammatory symptoms when milk removal is ineffective, but a tight bra doesn't automatically cause mastitis. The protocol recommends feeding responsively rather than trying to forcibly empty the breasts.
Recheck your fit as your body changes through the feeding period. If you're comparing options, use the same checklist for every bra; a supportive nursing bra for large breasts should make feeding access easier without adding pressure. For example, GAIA is described as a soft nursing bra with stretch lace, flexible support, and breastfeeding access. Judge any option by how it feels on your body and during a real feed.
Common Challenges and How to Fix Them
Engorgement and pain are common reasons feeding starts to feel harder. A 2025 cross-sectional study of 685 healthcare workers in Southwestern China reported that nipple and breast problems were the most common breastfeeding difficulty in that sample, affecting 68.8% of participants; because the participants were healthcare workers, those figures describe their responses, not the rate among mothers (study published in BMC Pregnancy and Childbirth).
Start with the symptom and make the first change that fits. The table also shows when a problem needs someone to assess it directly.
| Symptom | Likely Cause | First Fix | When to Get Help |
|---|---|---|---|
| Hard, swollen breasts before feeds | Engorgement after long gaps or short feeds | Feed responsively, express a little for comfort, and use cool packs between feeds | Fever, or a red, hot area that spreads |
| Tender, pressed breast under the bra | Band too tight or wire pressing on the breast root | Loosen the band, move the wire off the fold, and recheck fit | Pain that stays in one spot or worsens |
| Fast, gulping flow; baby coughs or pulls off | Forceful letdown | Lean back or try side-lying; pause if the baby pulls off | Repeated choking at feeds |
| Slow flow, tired baby, or weight-gain worry | Shallow latch or the breast obscuring the mouth | Recheck the latch and support the breast from below | No swallowing heard or concern about weight gain |
| Sore, cracked, or pinched nipples | Shallow latch or pressure near the areola | Re-latch and adjust the hold to reduce compression | Bleeding or visible nipple damage |
| Back, neck, or shoulder ache | Breast weight and slumped posture | Use pillows to bring the baby up and adjust strap width | Pain that persists after posture changes |
Make the feeding adjustment before changing the bra
A bra can't correct a shallow latch. Start with how your baby is positioned, whether you can see the mouth, and whether your breast is supported without pressing on the areola. Once the feeding mechanics are comfortable, check whether the band, wire, straps, or fabric are adding pressure.
A persistent red, hot, painful area, fever, or flu-like symptoms needs prompt clinical attention, especially if symptoms are worsening. Keep feeding responsively rather than trying to force the breast empty; a clinician can help assess the symptoms and advise what to do next. A change in position may feel better during a feed, while soreness caused by ongoing pressure or a latch problem may need consistent adjustments and professional guidance.
Feeding Comfortably in Public and at Work
Imagine returning to work around twelve weeks postpartum and dreading a feed in a meeting room. The room may be private, but that doesn't automatically make the chair comfortable, the latch easy to see, or the nursing clasp simple to use.

Before that day, practice your setup at home. Choose a chair with back and arm support, then place a small pillow under the baby so you can try a football hold without leaning toward them. Rehearse unclasping the bra with one hand until you can do it without losing your position. Tops with a wide neckline or a layered front can offer coverage without tight fabric pressing on your breast.
If you're pumping at work, plan around the times your baby usually feeds. Keep a small pump-day kit together with a spare top, nursing pads, water, a small pillow, and a plan for hand expression if the pump doesn't work. A simple boundary can be enough if someone interrupts: “I'm feeding my baby.” For more ideas on access and coverage, use these tips for breastfeeding discreetly.
Before changing your schedule, change the setup. Try the pillow and one-hand unclasp first, then decide whether you need a different place or plan for the feed.
Your Two-Week Fit and Latch Check
Use this checklist as a short routine, not a test you have to pass. It helps you notice whether your baby's latch, your support, and your comfort are improving together.
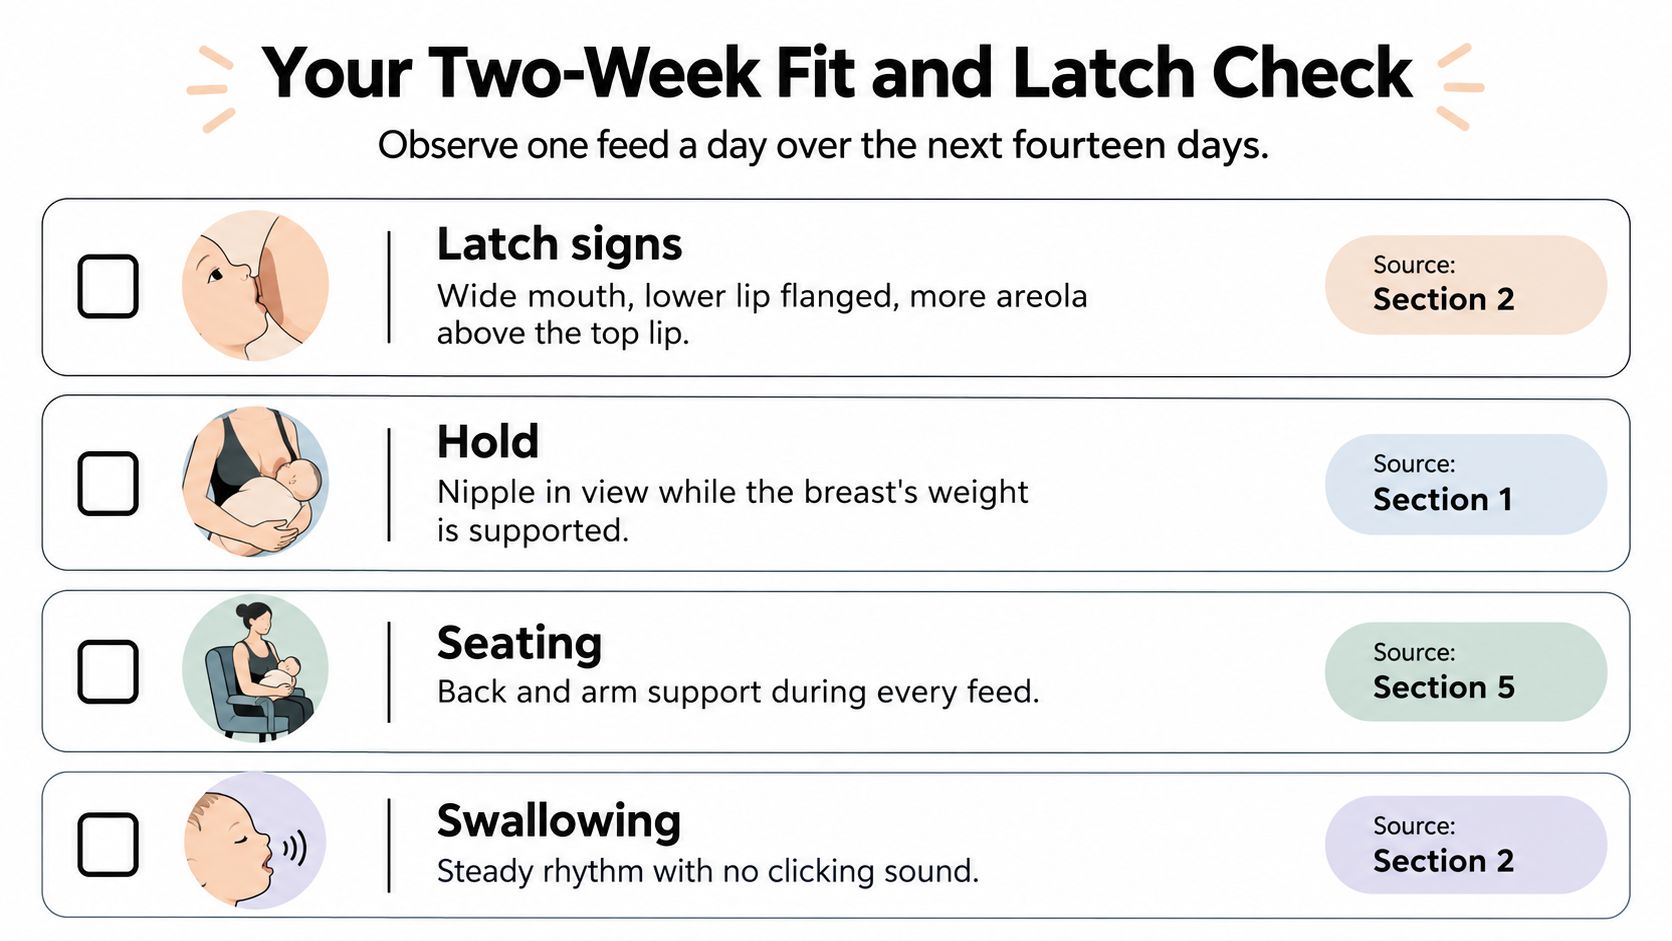
- Observe one feed each day. Check for a wide mouth, an outward lower lip, and more areola above the top lip than below.
- Track feeds and wet diapers. Make a note of any pain that feels more than mild, or if you're not hearing swallowing.
- Check your bra during an actual feed. Can you see the latch, open the cup with one hand, and sit without strap pressure?
- Recheck the fit around day fourteen. Notice whether the band still sits level and the cups support without squeezing.
- Arrange direct support if needed. Contact a lactation professional if pain, absent swallowing, or nipple damage continues.
If the bra passes the actual feeding test, keep using it. If it doesn't, choose another using the fit features above and check the retailer's size-exchange policy. Tomorrow, start by observing one feed for the latch signs.
Milk&Lace offers nursing lingerie designed to combine breastfeeding access with comfort and personal style. If you're choosing a bra for large breasts, use the fit checks in this guide and explore the options at Milk&Lace.